Gluten Free Chicken Pot Pie
Posted: 09/19/23
Updated: 04/03/25
This post may contain affiliate links. Please read our disclosure policy.
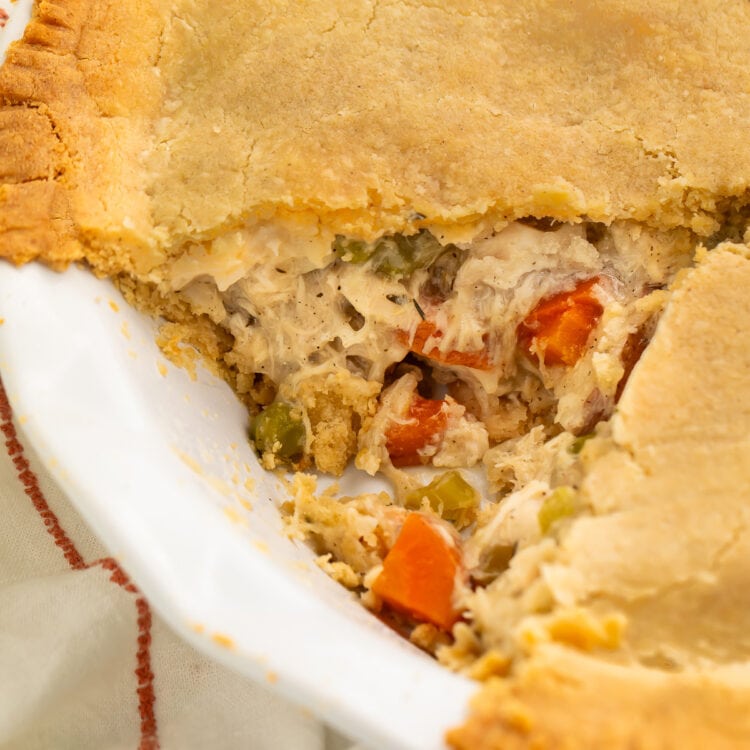
Made with a flaky, homemade crust, this gluten free chicken pot pie is sure to become your new favorite meal! Filled with a creamy, savory, and oh-so satisfying sauce that coats tender veggies and white chicken.

🥧 What Makes This Recipe So Good
- Whether it’s a traditional version or it’s gluten free, chicken pot pie is so satisfying and comforting that it’s hard to imagine a fall or winter without one. It’s full of tender chicken and hearty veggies, smothered in a creamy sauce and wrapped up in a flaky, warm pie crust.
- You can make this pot pie as involved or as simple as you like. The made-from-scratch gluten free pie crust comes together so easily, so don’t let it intimidate you! Honestly, the food processor does most of the hard work for you. If you’re short on time or energy and aren’t feeling a homemade crust, you can totally use a store-bought crust instead. You can also use frozen or canned veggies instead of fresh to cut down on prep time.
- Adjust the ingredients as-needed to fit your preferences or your way of eating. Follow a vegetarian diet? Just add more veggies in place of the chicken. Have any leftover turkey? Chop it up and use that instead of chicken. Extra veggies on hand? Toss them in! The possibilities are endless with this comforting and hearty dish.
👩🏼🍳 Chef’s Tips
- Gluten free chicken pot pie makes a great freezer meal option. Prep the pie ahead of time, then cover the unbaked pie with foil and freeze it up to two months. When you’re ready to bake it, remove from the freezer and defrost completely before following the baking instructions below.

More Comfort Meals We Love
- Gluten Free Fried Chicken
- Texas Roadhouse Chili Recipe
- Baked Chicken Tacos
- Ratatouille Soup
- Instant Pot Cajun Chicken Pasta Soup
- Salmon Wellington
- Olive Garden Capellini Primavera
- Baked Ziti Pasta
If you loved this recipe as much as we did, don’t forget to leave us a review below. ★ Follow Easy Healthy Recipes on Pinterest, Facebook, and Instagram, too!
For more delicious recipes, visit our sister sites, 40 Aprons and Easy Cheap Recipes.
Gluten Free Chicken Pot Pie
Flaky gluten free crust, filled with creamy gravy, tender veggies, and savory chicken.
servings
Ingredients
For the Gluten-Free Pie Crust
- 2 ½ cups gluten-free all-purpose flour with xanthan gum, plus more for rolling
- ½ teaspoon salt more or less to taste
- 2 4-ounce sticks unsalted butter 8 ounces total, cut into ½-inch cubes
- 1 teaspoon apple cider vinegar
- ⅓ cup cold water up to ½ cup if needed
For the Pot Pie Filling
- 2 cups low-sodium chicken broth or chicken stock, see Notes
- 2 small red potatoes approximately 4-5 ounces each, chopped into bite-sized pieces
- 1 medium stalk celery diced, approximately ½ cup
- 1 medium carrot finely chopped, approximately ½ cup
- ½ cup diced yellow onion
- ½ cup frozen peas
- 2 cups chopped roasted chicken
- 4 tablespoons unsalted butter
- 4 tablespoons gluten-free all-purpose flour with xanthan gum
- ½ cup milk or half and half, at room temperature
- 1 tablespoon dried sage see Notes
- 1 tablespoon dried thyme
- 1 pinch nutmeg
- salt to taste
- freshly ground black pepper to taste
Equipment
- Food processor
- flat work surface
- Plastic Wrap
- Refrigerator
- Parchment paper
- Rolling Pin
- ceramic 9-inch pie plate
- Fork
- Oven
- stovetop
- Large saucepan
- large wooden spoon or silicone spatula
- Small saucepan
- whisk
- sharp paring knife optional
Instructions
For the Gluten Free Pie Crust
- Add 2 ½ cups gluten-free all-purpose flour and ½ teaspoon salt to food processor bowl. Pulse until just combined.
- Add 2 4-ounce sticks unsalted butter (cubed) to food processor bowl. Pulse just until mixture is crumbly, with pea-sized chunks of butter remaining.
- Drizzle 1 teaspoon apple cider vinegar over crumbly mixture.
- Turn food processor on at low speed. While processing mixture, slowly pour ⅓ cup cold water into food processor through feed tube. Once dough is well-mixed but still lumpy, stop food processor. Dough should be fully combined, with no dry flour remaining, and shapeless but not smooth. It should stick to itself when pinched. Be careful not to add too much water or over-mix dough.
- Lightly flour flat work surface, then transfer dough mixture to floured surface. Shape dough into single ball, then divide ball into 2 equal halves. Be careful not to overwork dough.
- Form each half into one flat disc, then wrap discs in plastic wrap. Place wrapped discs in refrigerator and chill at least 30 minutes, up to 48 hours. See Notes below to freeze dough instead.
- When ready to use dough, remove dough discs from refrigerator and let sit at room temperature 10 to 20 minutes or until slightly softened.
- Spread parchment paper out on flat work surface, then lightly flour parchment paper. Unwrap dough discs and place on floured parchment paper.
- Use rolling pin to carefully roll dough out into two evenly-thick discs, large enough to fit in 9-inch pie plate and cover edges. Lightly flour rolling pin as needed if dough sticks. If dough begins to crack right away, let dough sit at room temperature 5 to 10 minutes more. Edges of dough will likely crack even if dough is soft enough to roll – simply pinch and patch tears as needed.
- Carefully lift one rolled dough disc off parchment paper. Center disc over pie plate and gently press dough onto bottom of plate, into corners, and up edges of plate as needed, forming bottom pot pie crust.
- Gently poke tines of fork into bottom pie crust, creating small vent holes across entire crust. Be careful not to make too many vent holes, or to make vent holes too large. Set pie dish and remaining rolled dough disc aside.
For the Pot Pie Filling
- Preheat oven to 400° Fahrenheit. Position oven racks so that pie plate will sit in center of oven.
- Place large saucepan on stovetop over medium-high heat. Add 2 cups low-sodium chicken broth, 2 small red potatoes, 1 medium stalk celery, 1 medium carrot (finely chopped), ½ cup diced yellow onion, and ½ cup frozen peas to saucepan. Stir to incorporate, then bring liquid to boil.
- Once broth begins to boil, immediately reduce heat to low. Simmer broth and vegetables 10 minutes, or until potatoes are just fork-tender.
- When potatoes are tender, add 2 cups chopped roasted chicken. Stir to incorporate, then simmer mixture 5 to 10 minutes more, until chicken and peas are warmed through.
- While vegetables simmer, heat small saucepan on stovetop over medium-high heat. Add 4 tablespoons unsalted butter to saucepan and let butter melt, swirling and tilting saucepan occasionally to distribute butter across entire surface.
- Once butter is melted, sprinkle 4 tablespoons gluten-free all-purpose flour into saucepan. Vigorously whisk flour into butter until fully combined and paste-like. Cook mixture, stirring occasionally, until roux is golden in color.
- Once roux is golden, remove saucepan from heat. Let cool slightly, then slowly add ½ cup milk (at room temperature), whisking constantly until ingredients are fully incorporated. Return saucepan to heat and reduce heat to low.
- Add 1 tablespoon dried sage, 1 tablespoon dried thyme, 1 pinch nutmeg, salt (to taste), and freshly ground black pepper (to taste). Whisk to incorporate aromatics, then simmer mixture, whisking constantly, until thickened.
- Once mixture has thickened, add mixture into large saucepan with chicken and vegetables. Whisk well until both mixtures are fully combined into one, then pour filling into pie plate, filling bottom pie crust.
- Carefully lift remaining dough disc off of parchment paper and center over pie plate. Gently place dough onto pie plate, covering filling and edges of plate completely.
- Carefully tuck edge of top crust behind edge of bottom crust, then gently press crusts' edges together with tines of fork, making sure to seal entire perimeter of pie.
- Make small vent holes or slits in center of top crust with fork or knife.
To Bake and Serve the Gluten-Free Chicken Pot Pie
- Place prepared pot pie on center rack in preheated oven. Bake pot pie 35 minutes, then begin checking doneness. Continue baking as needed, checking pot pie regularly, until filling is hot and bubbly and crust is golden.
- Once pot pie is baked as desired, carefully remove pot pie from oven and set aside. Let pot pie rest 5 minutes, then serve as desired.
Notes
- Chicken Broth: Not all varieties of chicken broth are gluten free! Some brands will use flavorings and preservatives that contain gluten, so be sure to double check yours before using it.
- Sage: It’s important that you use dried sage and NOT fresh or ground sage. Fresh or ground sage will overpower the rest of the dish and may turn the filling green.
- Make it Dairy Free: Use a plant-based butter. Replace the milk with almond milk.
- Make it Vegetarian: Replace the chicken with 2 cups of preferred meat alternative or vegetables of choice. Use a gluten-free vegetable broth instead of chicken broth.
- Make it Vegan: Use a plant-based butter and replace the milk with almond milk. Use vegetable broth instead of chicken broth, and replace the chicken with a meat alternative or extra vegetables.
Freezer Options
- To Freeze Dough: Wrap dough discs in plastic wrap, then place wrapped discs in freezer for 30 minutes. After 30 minutes, transfer discs to sealable freezer bags. Freeze wrapped dough discs in bags up to 3 months. Defrost in refrigerator overnight before using.
- To Freeze Prepared Pot Pie: Prepare the pot pie as instructed, letting the filling cool in the pie plate before covering it with the top crust. After placing the top crust, wrap the entire pie first with plastic wrap and then with aluminum foil. Place the wrapped pot pie in the freezer and keep frozen up to 2 months. When ready to bake, defrost the pie completely in the fridge, then follow the baking instructions above. I like to use an aluminum pie plate for this so my nicer pie plates aren’t stuck in the freezer for a month or two.
Nutrition Information
Serving: 1serving | Calories: 444kcal | Protein: 11g | Fat: 28g | Saturated Fat: 17g | Trans Fat: 0g | Total Carbs: 37g | Fiber: 4g | Sugar: 2g | Net Carbs: 33g | Vitamin C: 7mg | Cholesterol: 94mg | Sodium: 389mg | Potassium: 361mg | Calcium: 139mg | Iron: 27mg
Number of total servings shown is approximate. Actual number of servings will depend on your preferred portion sizes.
Nutritional values shown are general guidelines and reflect information for 1 serving using the ingredients listed, not including any optional ingredients. Actual macros may vary slightly depending on specific brands and types of ingredients used.
To determine the weight of one serving, prepare the recipe as instructed. Weigh the finished recipe, then divide the weight of the finished recipe (not including the weight of the container the food is in) by the desired number of servings. Result will be the weight of one serving.
Leave a Comment